Showing posts with label vintage hair. Show all posts

Thursday, 7 May 2015

Going for the chop: Lets talk about hair...

Just a quick post today. I've been trying hard with my hair lately, trying to learn more styles practising and improving the styles I know. Which has lead to a few good hair days.

For example this one (excuse the coat hanger). Where I backcombed and teased my victory rolls for the first time. Would you also believe I slept in this style and woke up in the morning looking like this?


Or there was the time I learnt to brush out my hair properly by using a proper large paddle brush (thanks to this tutorial).

 Glasses from SpecsPost by the way.

The only problem is that on lazy days when I didn't style my hair, it looked more like this:


SCARY!!!!!!

This is what I can best describe as a frizz bomb. It was really unfortunate that the leftover perm from over a year ago had taken its toll. The thing with perms is that you need to do regular intensive conditioning and to have it re-permed, which I did not.

So I decided to chop all of that damage off. I had a pretty drastic cut, adding layering, shortening and new colour that is much closer to my natural colour.

Now styling has been fun with this new do, at one point I ended up looking quite a bit like Moss from the IT Crowd...
But I am pretty confident that I have got the hang of styling it now :) I am really enjoying how easy it is to set too as there is so much less of it! I'm starting to feel a little more like Betty Draper than a frizzy lion.


So I will have to give the complex up-dos a miss for a little while but at the moment I am totally not missing them. Several people at work have even told me that I look like Snow White :)


Saturday, 20 December 2014

Why I love the Lily of the Valley Kitty dress from Vivien of Holloway

If you follow my instagram you will have certainly seen me in a Vivien of Holloway dress. They are one of my favourite vintage reproduction brands (although I must confess there are plenty of brands I haven't tried yet!) which is why I decided to get their Kitty dress for my graduation last summer.

Good ol' Viv then decided to remake the Kitty dress in a new, and I believe limited addition, range of fabric and I knew I had to have another Kitty. I decided to go with the gorgeous green Lily of the Valley print and I think I managed to snag the last one in my size as they are now out of stock in most of the sizes. Mind you there are plenty of other bloomin' gorgeous print dresses in the same style.
Trust me if I had all the monies I would have one in every colour!!

I ADORE this dress. Here are all the reasons why...

Pockets: It has huge roomy pockets for your gloves, trinkets, money and (in the winter) handkerchiefs. Meaning there is no need for a handbag. I love the freedom of a dress with pockets and when the print blends perfectly with the dress you simple can't go wrong.


Skirt: It has a super full gathered skirt with a length of 30 inches so it is perfect for dancing as the skirt won't swish up and for dressing with that mid-century modesty.


The fit: As with all Vivien of Holloway dresses, the fit is based on vintage patterns so the bust/waist/hip ratios are a better for someone with a 'vintage figure' (someone with more than 10 inches difference between their waist and hips). The 16 is perfect for my 30 inch waist and frankly enormous hips and I found that the bust was ample enough for my bust without gaping at the buttons.

Being a bigger girl (size 12/14/16 ish depending on the brand) I find Vivien of Holloway a magnificent way of getting vintage style clothing as I find to difficult to find genuine 40s/50s vintage in my size (just means I have to try extra hard).


The Print: Come on. It's beautiful. 'nuff said.


So yes I absolutely love this dress...

I also think my hair ended up looking pretty good this day. I bought some nylon scarves from Vintageous on youtube and they are a great vintage style hair addition. I'm so pleased that my hair is finally long enough at the front to roll. I much prefer my hair this way than with the fringe. Would you agree?


Dress: Vivien of Holloway
Necklace: Vintage
Shoes: Doc Martens


Wednesday, 5 November 2014

A green 1970s skirt for £1

Apologies in advance, my husband is away so I have no one to take my pictures :( So as a result this post consists entirely of selfies. Are they still selfies if you take them in a mirror?

Anywho, I really wanted to share something today as I am feeling rather proud of myself. At the end of August I made a decision to make some lifestyle choices to try and change my health/fitness and confidence. I've since lost about a stone, and plan to lose some more weight as I continue to improve myself.

When I bought this skirt I couldn't even get it done up. I saw it on a £1 rail in a charity shop and I decided to buy it anyway as you don't often see turquoise skirts, and especially not vintage ones. This one is early 70s and it now fits like a dream. Which is amazing. Especially given my stupid 13.5 inch waist/hip difference.


The blouse is very sweet and came from Monsoon in the sale some time ago. Its not often that you get a white blouse with green highlights so I couldn't help feel that it was made to go with this skirt.

The cardigan is a wool number form the 1980s (you can tell from the gold buttons) but I felt that it complimented the green of the skirt wonderfully.


And without cardigan.


I also felt that I should show you my hair, it is a double flat victory roll with an asymetric parting. I added flowers to the side to balance the look and brushed out the curls at the back to get a wave the the bottom of my hair but a smooth finish.

My hair is getting quite long again now. I think the longest parts are around the ideal length now, but still waiting for the fringe to grow...


Skirt: Vintage
Cardigan: Vintage
Blouse: Monsoon


Thursday, 16 October 2014

5 Vintage Hairstyles for Growing Out a Fringe

Okay, so here is my hair in its current state of play. Current state of mess more like... I have always hated the long process of growing out a fringe. Its boring, takes forever and it is the
reason I put off having a fringe back in. So now I want rid of that fringe and oh boy is it taking forever!


So I have now decided to make it my mission to find interesting things to do with my fringe. I think I know enough not to share some of them.

Let me know what you think, and if there is anything you want a tutorial of, please let me know in the comments.

1) Three pincurl fringe.
I separated the whole front section into 3 with a far right parting. I formed two down facing pincurls nearest my parting that allowed me to catch the parts of my fringe and the other one was facing up.

I also curled the back of my head to give it a it of a wave, although on this occasion that didn't work too well.


2) The pin-up bumper bang.
Using a hair rat hides so many wispy fringe bits! I rolled the side parts into victory rolls and then forward rolled the front part around a hair rat/filler to give it maximum fullness. I joined the sides of the roll together by fanning the hair out around the rat. If you want to try this style I fully recommend Vintageous's youtube tutorial. If it can help me do it, it can help you!


Here's that gorgeous Tiger Milly apple dress again too!

3) The victory roll.
This one is sort of a classic. I split my hair into two parts and rolled each half up to my parting. My hair is just long enough to be pinned at the back of the roll.


4) The pseudo-suicide roll. 
Yet another use for that hair rat. In this case I separated all the top part of my hair forward and put it in a hair band to keep it in place. I then rolled it around the hair rat to create the side sweep bumper bang. Its not quite a suicide roll, as it should have a distinctive swirl at the end of it but its a simplified version that works with quite short fringe bits.


5 Asymmetric victory rolls.
This one is similar to number 3, but the victory rolls are to the side of your head. This one is actually easier to get your fringe into than the traditional symmetrical roll as you have longer parts to work with because of the position of the rolls. Whack a couple of hair flowers in there to complete the look.


Which one do you like best?
They will all work with a fully grown out fringe too!

Oh, and pretty please tell me your favourite dos for growing out a fringe!


Thursday, 10 July 2014

Vintage Hair Inspiration: Retro Rolls

Ahhhh, victory rolls, poodles, twists and beehives, I love them all. I especially like elevated pin curls (a roll that sits up on top of your head rather than lying flat on your head) largely because they look good on the day, but because they make your hair wonderfully curly after you take them out too.

This is the type of thing I mean, somewhere between victory rolls and a poodle do:


Image source
So now that my hair is getting longer again I have decided to experiment with up dos again.

Here's a more recent attempt at an elevated curl up do:


I'm currently finding my fringe super annoying as I have decided to grow it out and it is too short to do anything with it yet. But soon it will be long enough to get it out the way. Hopefully. As soon as its long enough I'll probably want a fringe again...

Oh well.

(P.S. Look how grey I am!!!)


Tuesday, 3 June 2014

Retro Hairstyle: Jennifer from Back to the Future

I have a very serious question, does anyone not like Back to the Future? I have to say I am a little bit biased as I not only love 1980s fashion but also 1950s fashion. Its basically a dream for me style wise!

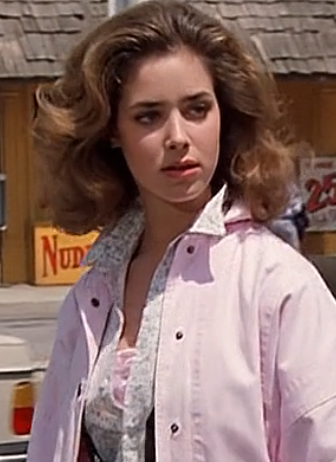
One thing I always envied was the hair of Martie's girlfriend Jennifer (not least because she has the same name as me). That volume! That curl! Wow! 


So feeling volumised with my perm I decided to set my hair and brush it out aiming to get a cross between this and a bit of Lorraine McFly in the 1950s:


After all they're pretty much the same hair style... I'm not really sure what that says about Martie, but lets not go there...

So here is my version:


I had to take a picture with my 50s style glasses on too:


What do you think? To be honest, I would be pretty happy if I could channel this look every day...


Wednesday, 28 May 2014

Vintage Inspired Outfit: Wannabe Sweater Girl

I adore the sweater girl look. Its just so perky. I think a great casual vintage inspired look is the sweater and cropped trousers or pencil skirt, especially in spring as the weather is changing. Marilyn Monroe was one of the sweater queens of the 1950s.


So attempting to take a lead from the history style books I decided to wear a sweater and pencil skirt combo for a wander around town on a spring day.

A good friend of mine has this same pencil skirt (and has done for years) and I always though it was a great skirt; a sort of universal colour with a small print that preventing it being just a dull 'black pencil skirt'. You can imaging how pleased I was when I found it in a charity shop in Hove for £2! In my size! YEEEEES!


The sweater was from eBay and had the labels cut out so I have no idea when its from, but I love it. I think it is a perfect colour and I adore the little collar details, its so universal, I would definitely recommend this sort of pinky/peach sweater to anyone crafting a vintage style capsule wardrobe.

The only problem is, that since putting on a bit of weight my bust size has changed. I dare not admit either that I didn't get myself measured for ages and I was somehow convinced that my bust had not changed. Oh how wrong I was, by two cup sizes. So naturally my vintage inspired underwear is not really right anymore meaning that I was not able to achieve the perfect sweater girl look, but its not far off. I am now hunting for the perfect slightly larger vintage styled bra.


I've shown this satchel before on Fancy Dresscapades, but I think that the colour of the flowers goes with this outfit perfectly.


The hair in these pictures is me still getting to grips with the permed hair. But I was pretty pleased with how it turned out. 


I still haven't quite got the hang of pin placement, especially on the back of my head but I felt that I didn't do a half bad job this time around. Hopefully if I keep practising I will be able to share more snazzy hair dos, and maybe one day actually share a tutorial or two!


Jumper: Unknown/eBay
Skirt: Primark via charity shop
Tights: Primark
Shoes: Clarks
Satchel: Yoshi


Sunday, 11 May 2014

Doing a Pin-up home perm

Right then, for a few weeks I've been experimenting with my hair, and I am finally ready to share what I've been up to - I want to talk to you about permanent waves or perms.

Now I have pretty boring hair, mostly straight with a little wave at the bottom and a bit of a tendency to frizz if I blowdry. It used to be pretty curly when I was younger, but its something that's gradually dropped from my hair during the years. So the idea of a treatment that could put a bounce back into my bob (I don't have a bob but you know, alliteration...) was pretty appealing.

The only problem is, you think perm and you think... well, Julia Roberts and Meg Ryan in the 80s? Even a bit of Bon Jovi? Or how about my Mum from the late 80s?

Me and my Mum in the late 1980s


Of course, my Mum's awesome but I think she must have done something magical to achieve that sort of volume and its not exactly the sort of look I wanted...

So waaaaay back at Easter I stumbled upon a product in Superdrug that sparked my interest. It was called Pin-up Original and it was a kit to perm your own hair at home. Something about perming my own hair appealed to me, it would save the cost of going to a hair dresser and it would mean I could set the rolls in exactly the style I wanted, getting *hopefully* the result I wanted.

I contacted the folks at Pin-up and they were really helpful, with so much advice of what size rods to use, how to treat my hair and what to do about setting it once it was permed. But even better than that they sent me a home perm kit containing rollers, waving lotion, a mixing bowl, pre-perm protection spray and their own setting lotion to try out so that I could tell all of you lovely readers about it**.


Part of the reason I was so interested in the Pin-up product specifically was that they have been making home perming kits since 1945! So I felt that if anyone understood the mid-centrury look I was striving for then they would. Check out these classic advertisements for their waving kits:


I received my Pin-Up super quick and feeling psyched up, I set aside some time on the bank holiday weekend to give it a go.

I was advised to use small rollers as they would create a firm wave that would hold a vintage hair set, although the prospect of this terrified me. Overall I used about 33 rods in my hair in 5 different sections and it was such a pain to put the wrappers on then roll the hair, but you know, after I did a few I felt like I was a bit more able and things progressed a bit quicker. Practice makes perfect I suppose.


I applied the perming lotion and it was pretty straight forward although it did smell interesting, like that smell that hair salons had in the 80s. But it only took 10 minutes to set into an S-wave which was amazingly quick.

Then came the neutralising part, this was a bit more tricky. You are meant to shake up the bottle and lather your hair, but the tube for putting it on your hair is really difficult to work with. In the end, I just shook the bottle and squeezed the foam onto my hair which was a muuuuuuuch easier way to do it.

After rinsing I would say I was pleased with how the curl had taken. It looked pretty wavy, but not too extreme, and not... erm... 80s.


Finally I had to let it dry. I misread the instructions and though that the 'do not style for 48 hours' meant I couldn't brush it or set it (oops) so I ended up with a bit of a mess if I'm honest. Knowing what I know now I would have done was wet set in in pin-curls to help the curl set, but oh well. Next time!

After 48 hours I was sort of at my wits end with it, it looked quite frizzy and I would be lying if I said I didn't start to second guess my permanent wave...


Then the magic happened!

I washed my hair and set it in pin curls and oh boy, did it turn out curly! I took two pictures one at the start of the day and one at the end. I used my usual setting lotion and didn't brush it out so I could get a clear picture of how the curls lasted.


Boy was I impressed. The curls lasted the whole day largely unscathed.

I then tried pincurl setting and brushing out and I'd say it looked pretty similar to the way it did before the perm, but the bounce just seemed to last a bit longer.


Generally I was really pleased, with how the curl is lasting and that it didn't seem to vastly change the texture of my hair (as I've heard that perms do) but I did find that I haven't had to wash it as much lately. Not that I'm complaining about that.

I also experimented with rolls and curls to see how styling worked and I found that the slight increase in roughness of the hair meant that it was easier to put up.


A special bonus was that when I take my hair out, even after just putting it up dry for a few hours I manage to get a lovely curl out of it. This is something I really, really appreciate.


The overall selling point of Pin-Up is that it is meant to be an invisible wave that just helps keep the style lasting a little bit longer. Which, lets face it, is exactly what all girls dream of, and I actually think that is what I've managed to get. Although I have taken special care not to blowdry my hair for fear of generating that 80s look. I recently ordered a diffuser so that I can use the dryer and I'll let you know how that goes another time.

******

So thinking back on my perming experience at the time of writing, its been 3 weeks since I had the perm done, and if I'm honest, I haven't really found that the curl has dropped that much. It has a little bit, but when I've just washed it I'm seeing roughly the same amount of wave as I was at the start.

I think I'm also more used to the ways of styling and have built a routine. I wash then curl with pin curls until it is completely dry. I then take it out and brush out or wear super curly depending on the look I'm going for. I've found that it doesn't need washing for around 4 days so that means it has become much easier to do vintage up-dos. YEY!!!

In the long run I will be interested to see how long the wave lasts, but at this point I would definitely do a perm at home again!


**Full Disclosure: The kit was sent to me free of charge

You may also like...

Related Posts Plugin for WordPress, Blogger...