Showing posts with label Sewing and Craft. Show all posts

Saturday, 16 May 2015

Vintage inspired skirts in retro prints

When I began thinking about this post I very much had Dita Von Teese in mind.

Image from Betty Le Bonbon

I just love her style of big flouncy skirts in vibrant colours or tweeds and sometimes with exciting prints. It is a look I have always liked and the feature skirt and classic T-shirt was a staple of mine in my undergrad days.

I have really struggled lately to find good skirts. Especially when it comes to vintage. I'm not sure if skirts were just worn more so they haven't lasted as long as the more available 'special occasion dresses' of if skirts just weren't as popular (I lean towards the former).

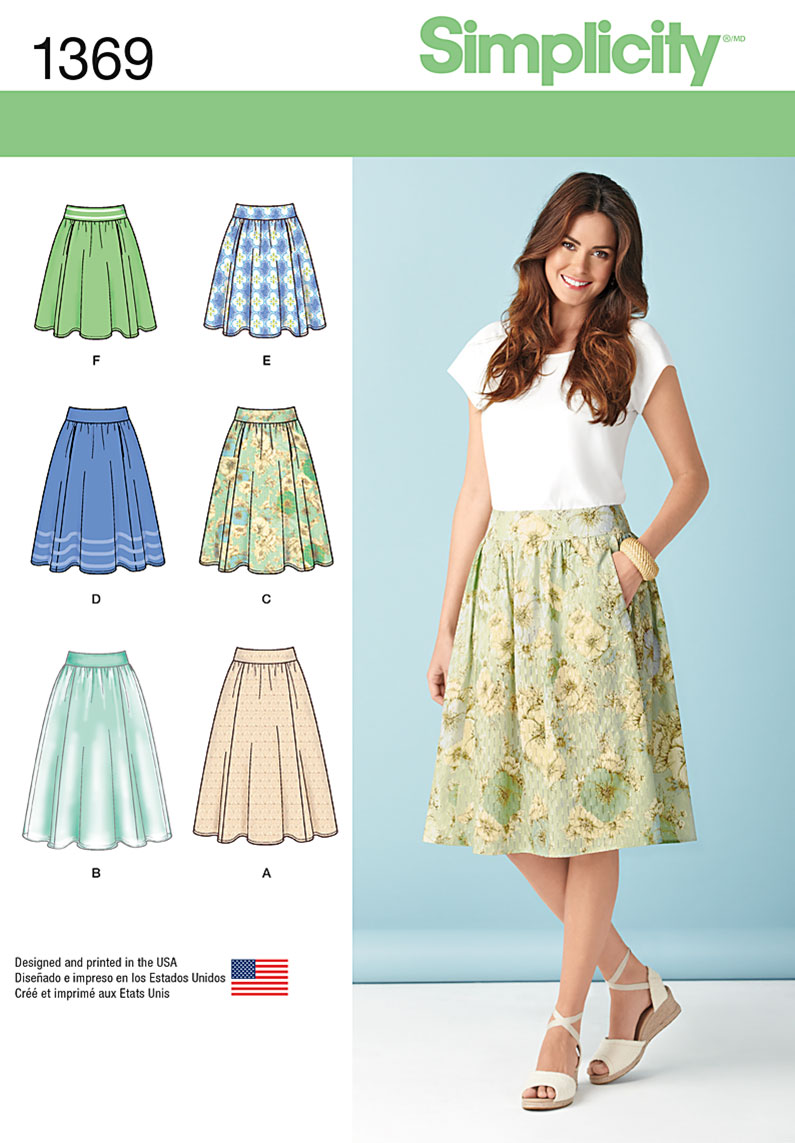
So I decided that the best way to get hold of a 50s style skirt was to make one myself. I wanted to go for a gathered skirt rather than full circle as circle skirts can sometimes look a bit cliche. I used Simplicity 1369 in the longest length with a few minor tweaks.


I found an amazing fabric shop in Scarborough that was selling beautiful print cottons for less than half RRP! So I gave myself a treat and bought some cute fabrics so that I could make some skirts.


The first skirt I made was in the black apple print fabric. I made the size according to my measurements however I found that the waist was too big, so I had to take it in :S whoops... Sorry I don't have a better picture of this one.


The second one I made was in the leaf print. I also interfaced this one with more stiff interfacing around the waist which I found I really liked. I did make the really stupid mistake of having the leaves face up on the front and down on the back however... whoops. Thank goodness the pattern hides it quite well!


The skirt even has a pocket!!


I also decided to make the dress in a really amazing 60s/70s red and blue print. I made this skirt extra full.


I took quite a lot of care with this skirt to pattern match which is not something I've done before. It was quite a bit of a faff, but I think it was worth it when I considered the finished look of the whole skirt.

In these last pictures I wore the most amazing shoes. A pair of Rocket Originals in red leather. The style is called Judy and they are so comfortable and amazingly retro looking, but that is because they are designed based on vintage shoe patterns. I never thought I could wear a pair of sling backs, but these are perfect!


Outfit details:
Skirts: Home made
Shoes: Rocket Originals and Clarks
Top: Laura Ashley t shirt/Primark tshirt
Cardigan: GAP thrifted

Have you ever got an item of clothing in several different colours?


Tuesday, 5 May 2015

A #MeMade Snow White cosplay costume for World Book Day

So kicking off Me Made May, which I am not officially part of but would like to dabble in, I have a cosplay costume to share with you.

I really love Disney, like love Disney, but lets face it Disney is a bit of a Marmite, the people who love it, love it and the people that hate it, hate it. I have found that Disney is popular in cosplay circles and I can completely understand why. The dresses! Who wouldn't want to try and make those beautiful and sometimes rather offbeat ballgowns.


When I was a little girl I was lucky enough to go to Disney world in Florida and I can very vividly remember the moment a lady ran up to my Mum saying 'Oh wow, you look just like Snow White! That pale skin, that dark hair!'. My Mum was flattered and a little embarrassed and as the years went on we both got older and I started to look more and more like she did on that day (although a little rounder...).

So when it came to choosing a costume for World Book Day back in March I decided that I wanted to dress as Snow White. Because she was one of the original fairy tales committed to writing by the Brothers Grimm, but also because I wanted to make a costume my Mum might one day be able to wear so she can be Snow White again.

This was the first Disney costume I have made completely and 100% from scratch but I did have a little help in the form of Simplicity pattern 2813 Snow White and Cinderella.


Firstly I would like to say that this is the greatest pattern I have worked with so far. I WISH I had known of its existence when I made my Princess Daisy dress (although that still somehow turned out pretty well).  It had really comprehensive instructions and was really straightforward to follow despite containing some really complex elements. Well done Simplicity!!

This costume took a lot of fabric and as I decided to make it in a better quality cotton it was not cheap to make, but I am feeling like it will be a great costume to wear again and again.

I started off making the bodice that was not only fully lined but also had interfacing around the collar, these were two new skills I learnt just for this costume but interfacing makes SUCH a difference I could not believe it (that's the white stuff poking out at the seams)!


I also learnt how to applique the design on the sleeves using wonder webbing and a new zig zag stitch on my sewing machine, which was fairly simple, however what was not simple was the white collar.

I SPENT 3 HOURS ON THE COLLAR!! It has two layers of stiff interfacing, an attempt at machine overlocking and strategic velcro attachment so that the collar would also stand up AND be detachable. It was very hard work, but I was so pleased with the finished effect.

Also how much do I love my swirly fancy fringe in this picture!!

And here is the final outfit, including the hair bow, that I also made myself :)

And here is a quick selfie I took with my wig on before heading off to work.


Annnnnnnd here is the final thing, complete with apple! I really wasn't pleased with the make up as I had to keep it fairly toned down for work, I am looking forward to wearing it again, and since I have had my hair done, I wont need to wear a wig - YES!


Sad news is that I didn't win the staff competition this year, but I don't think it would have been very fair to win two years in a row.

But I did get some very weird looks on the train!

The best part of the who day was when I walked past the nursery near my work and one of the staff came running out to ask me to say hello to the children. It was adorable!

What do you think of my costume? Do I make a good Snow White?


Tuesday, 9 December 2014

Working with Worbla for a Marvel Black Cat mask

So one thing that I really love about cosplay, and I'm sure a LOT of cosplayers will agree with me, is the chance to learn new skills. I've learnt how to sew, how to style my hair, paint my face and more recently I've started to explore props. Up until now I've been working with craft foam a lot but I decided to take the plunge and invest in some Worbla's finest art.

If you're new to cosplay Worbla is a thermoplastic that can be heated and shaped using a hairdryer. It comes in big sheets that you can cut with scissors and it can be sanded and painted easily. Because of this it is becoming the craft material of choice for people making armour, masks, weapons and other replica cosplay items.

I decided to make something simple and useful for my first Worbla construction. A mask. I've dressed as the Black Cat before, but she is one of my favourite characters so I thought the chance to improve it a bit would be fun, that way I could make a fairly generic mask as a first project.


So I cut two pieces of the Worbla and stuck them together. I then heated them with the hairdryer to stick them togeher. Putting two pieces together means that it was a bit more sturdy and any of the overlapping edges can be sanded away pretty easily.


I then heated the mask again and placed it over my face (once it had cooled enough). Because the plastic is still soft you can press it against your skin and really shape it so that is snug.


I then spray painted the mask with an under coat of grey spray paint to fill gaps and smooth it out.


Then I coated it in matt black spray paint. I 'glued' the mask to my face using spirit gum, it really helped that the shape fit snugly to my face so I actually didn't need a lot of spirit gum.

And here is the finished thing, what do you think?


Here is a picture without the wig too so you can really see the shape of the mask.


Aaaaaaaand finally the shot after the mask removal... It left a horrible amount of gunk on my face that I then had to peel off, sort of felt like I was painlessly peeling pieces of skin off. A very odd sensation indeed.


Do you think you would try making some props out of thermo plastic? I can highly recommend it!


Monday, 20 October 2014

Sailor Neptune cosplay costume review from CosplaySky.co.uk

If you've followed any of my cosplay posts you will know that I like to make costumes, but that I also sometimes like to buy ready made costumes.

I've wanted to make a sailor fuku costume from Sailor Moon for some time but I really wasn't sure I had the skill level to make one. Now there are many cosplay costume shops online and largely they are based in China and when you order online it can be really difficult to know exactly what to expect.

That's why when Cosplay Sky agreed to send me a Sailor Neptune costume to review I jumped for joy! The costume retails at around £30 which is pretty cheap for a cosplay costume (although it is not currently listed on the site).

Lets start with the basics, how does it look?

I should probably start by saying that Sailor Neptune is my favourite scout/senshi so I know her costume well.

Here is a picture of the costume from the website. Generally the accuracy is pretty good, there are no stripes on the collar and the sleeves are the correct style. However the colour of the bows are a little too bright and the star on the neck isn't quite right, but generally its good.


What about in real life?

When the costume arrived I was pleased to find that it was rather like the picture, the colours and style are pretty much the same and the fabric is as expected given the shine you can see in the web picture.

I would say that the white lycra is a little thin on the main bodice section, but the skirt rolls and sleeves make up for this. I am planning on wearing a vest underneath to make solve this issue.


I still think that the colour of the bust and butt bows is a bit off, but lets face it, you can see this colour is exactly as shown in the picture so you do know what you're getting.

What about the quality?

I was actually quite impressed with the quality, the skirting is crepe back satin and the collar and bows are interfaced. As I said the lycra is a little thin, but this is a minor issue.

The costume arrived clean and well packaged and I couldn't find any loose threads which is a bonus. 

I would say that the stitching around the collar and sleeves is excellent, but some of the pleating around the skirt is uneven, but its not really noticeable when worn. An added bonus is that the inside seams are all overlocked so you don't get any fraying, but this does mean there is no extra fabric to work with should you order a size too small.


The fit
I have read mixed reviews about Cosplay Sky, several people have stated that the sizes were too big and that the costume didn't fit right. Especially when  sending custom measurement.

I sent my measurements so the costume was made for me and I was delighted to see that it fit exactly as I expected. As far as I could tell the bust and waist were as ordered (give or take 0.5 of an inch) and with stretch fabric this isn't an issue.

I also ordered a skirt length of 19 inches. Now this is WAAAAAY too long for a Sailor Neptune costume so I was very interested to see how it turned out. The main reason I had for doing this was that I don't really like my legs so I wasn't sure what length would be most flattering and this way I could alter the length myself to make sure it was just right.

And guess what, I measured the skirt and it was exactly 19 inches - so no complaints from me!


The accessories
The fuku came with several accessories, the bows, gloves, tiara and choker. I found that the gloves were a little too long for Sailor Neptune, but I wore them rolled down so it wasn't a problem. I also found that the choker was too big, but I fixed this with a small stitch to the back. So no problems there.

The bows however, I didn't like. I thought that they were somewhat squished and the top section was way too small compared to the bow tails. They looked okay pinned in place, but I wanted them to be a slightly more accurate colour so I decided to make two new ones in a darker blue and a more even shape. The bows I was sent are completely passable if you're not able to sew, but if you're looking for something a little more 'perfect' then you could change these. Making the bows is quite a nice little sewing project for a beginner by the way.


Here is the finished version with the switched bows and the altered skirt length:

The chocker and the tiara were pretty good in my opinion. Aside from that stitch in the too big collar they were fine. I made a new gem for the necklace out of craft foam to cover the star but again, you don't HAVE to do this.


Neptune Tiara Action!


And here are the gloves:


Clutching my home-made deep aqua mirror. To make the mirror I used the main body of a mirror I found at an antiques fair, its so like Neptune's I couldn't not get it! LUCKY!

I used painted craft foam and hot glue to make the backing. Its not exactly perfect, but I think it has the right effect. I've recently been experimenting with Worbla so I may re-make the mirror back with moulded thermoplastic, but we shall see.


And a closer view of the finished mirror:


What do you think?
I'll be wearing this costume to MCM Expo in a few weeks so I will follow up with more pictures then!

Do you have any plans for dressing up on Halloween?


Sunday, 31 August 2014

Sewing a reproduction vintage pinafore or jumper

I've always liked pinafores, dungarees or any kind of skirt with straps that go over the shoulder. I've had 'vintage pinafore' saved on my eBay saved searches for years. But I've not had much luck. For some reason the pinafore skirt doesn't seem to crop up much in the UK. There's been a bit of a fad lately to have little skater skirts with braces attached to them but nothing really substantial.

So I decided to make my own.

I began searching online for patterns, and wasn't having much luck, but then I had a break through when I spotted a gorgeous pinafore on The Fiercest Lilliputian Blog (an awesome blog btw) and I saw that she called it a 'jumper'. Now in the UK a jumper is a wooly thing you have to put over a head (a sweater to my US friends) so I was a tad confused.

I took to eBay again searching for 'vintage jumpers' and got a load of Cosby sweaters...

But change that search to 'vintage jumper pattern' and a few results popped up. And then I saw on in my size (just about) from the US. It was a size too small but I was confident enough that I could adjust the pattern so that it would fit so I went for it. Being a pattern, international postage wasn't expensive and it only cost around £4 in total.


As soon as it arrived I went fabric shopping as I thought this would be a perfect Autumn transition outfit. I chose some softer green twill that was mid range in price, it cost about £16 for all the fabric I needed. I added extra full facing to the inside of the top because I wasn't doing the ric rac or binding from the pattern and that was a bit of a pain logistically. At one point I sewed the waistband on back to front and I had to unpick the WHOLE THING - that was 2 rows of stitching :( Oh, and fitting the bust was a nightmare! I've got to get a dress form.

Anywho, here's how it turned out!


Detail to the top (I LOVE top stitching!):

So here's the final product. I've not taken proper pictures yet, but I think the dress is a little too wintery for August/September so give me a few weeks. But you get the idea.
Saying that I'm pleased is an understatement. I think this will be the perfect transitioning into winter dress! I'm not on a mission to make it in ALL THE COLOURS!

If you like the look of a vintage style jumper/pinafore then Collectif's new season has a lovely one with a flock polka dot. I'm going to save up for that one now too as I'd love to try it out!


You may also like...

Related Posts Plugin for WordPress, Blogger...